

A drip system can put water close to crop roots, but buying enough tubing to cover a field is only the beginning. The source must deliver the required flow, the farthest rows need adequate pressure, and small emitter passages need protection from clogging.
For growers planning vegetable blocks, orchards or nursery rows, a short worksheet can make equipment quotations easier to compare. Record measurements first, then ask suppliers to explain how each component fits the same design. These six checks provide a practical starting point.
1. Measure the working supply
Measure water flow and pressure together while water is moving under a representative load. A pressure gauge read with all outlets closed does not establish what the source can deliver during irrigation. Likewise, a pump’s maximum flow and maximum head are not normally available simultaneously.
Use a suitable flow meter, or time a known volume for a small supply. Record the test conditions, including tank level or other users sharing the supply. Where borehole yield, storage or pumping conditions vary, plan around a dependable operating condition rather than the best reading.
2. Calculate each zone’s demand
Start with the actual crop layout: row lengths, spacing, slope and the number of laterals per row. Calculate demand from the chosen emitter’s rated output at its specified pressure. Products rated per metre need a different calculation from products rated per emitter.
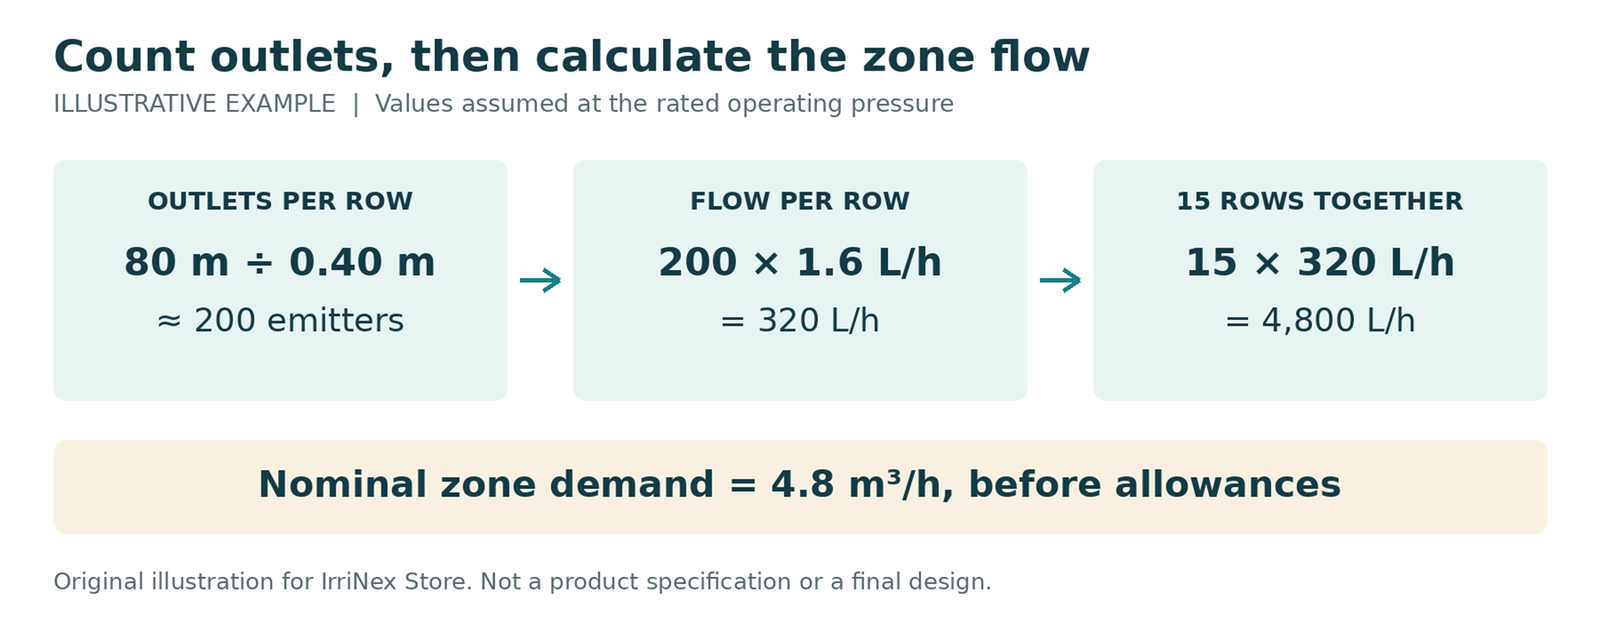
For illustration, an 80-metre lateral with emitters every 0.40 metre has approximately 200 outlets. At a nominal 1.6 litres per hour each, that row requires 320 litres per hour. Fifteen similar rows require 4,800 litres per hour, or 4.8 cubic metres per hour, before allowances. This is arithmetic for an assumed layout, not a product recommendation.
Group crops with similar watering needs and rows with similar lengths or elevation. Changing the planting pattern later can alter both flow demand and scheduling.
If that demand exceeds the dependable supply, divide the field into separately operated zones. Check that available pumping hours still allow every zone to receive its required daily water volume.
3. Check pressure along the route
Pressure is used in overcoming friction through pipes, fittings, filters and valves. Moving uphill also reduces the pressure available downstream. Ask for a pressure budget covering the route to a demanding outlet, including the longest or highest lateral.
Use manufacturer tables for the exact lateral, flow and slope. A larger delivery pipe or shorter zone may help; pressure-compensating emitters must still operate within their specified range. A pressure regulator reduces excess pressure and cannot remedy an inadequate supply. Have a qualified irrigation designer check pump duty and difficult terrain.
4. Match filtration to the water
Select filtration using both water quality and the emitter manufacturer’s requirements. Sand, fine sediment, algae and dissolved minerals present different problems. A screen or disc filter suited to relatively clean water may be insufficient for a heavily contaminated surface source.
Ask whether pretreatment or media filtration is needed, what flow the filter can handle, and how it will be cleaned. Provide accessible pressure measurement before and after filtration. Compare readings with the clean-filter baseline and the manufacturer’s cleaning threshold. Filtration alone does not remove dissolved salts; obtain water analysis and specialist advice where needed.
5. Buy compatible, serviceable components
Compare lateral wall thickness, emitter spacing, discharge and operating pressure, alongside expected handling and service life. Seasonal tape and reusable round tubing can require different connectors even when both carry a similar nominal diameter.
Emitter spacing should also suit the soil and crop root zone. Check how water spreads between emitters instead of assuming every soil wets the same way.
List the exact pipe dimensions, connection standards, valves, gauges, repair couplers and reopenable flush ends before ordering. Include access for cleaning and repairs. If adding fertigation, obtain appropriate source protection and qualified advice on injection equipment and applicable local requirements; the irrigation layout alone does not establish a safe chemical programme.
Include cleaning labour, replacement tape, repair parts and energy in the operating budget. Choose components that the person maintaining the system can identify and service.
6. Test, record and adjust
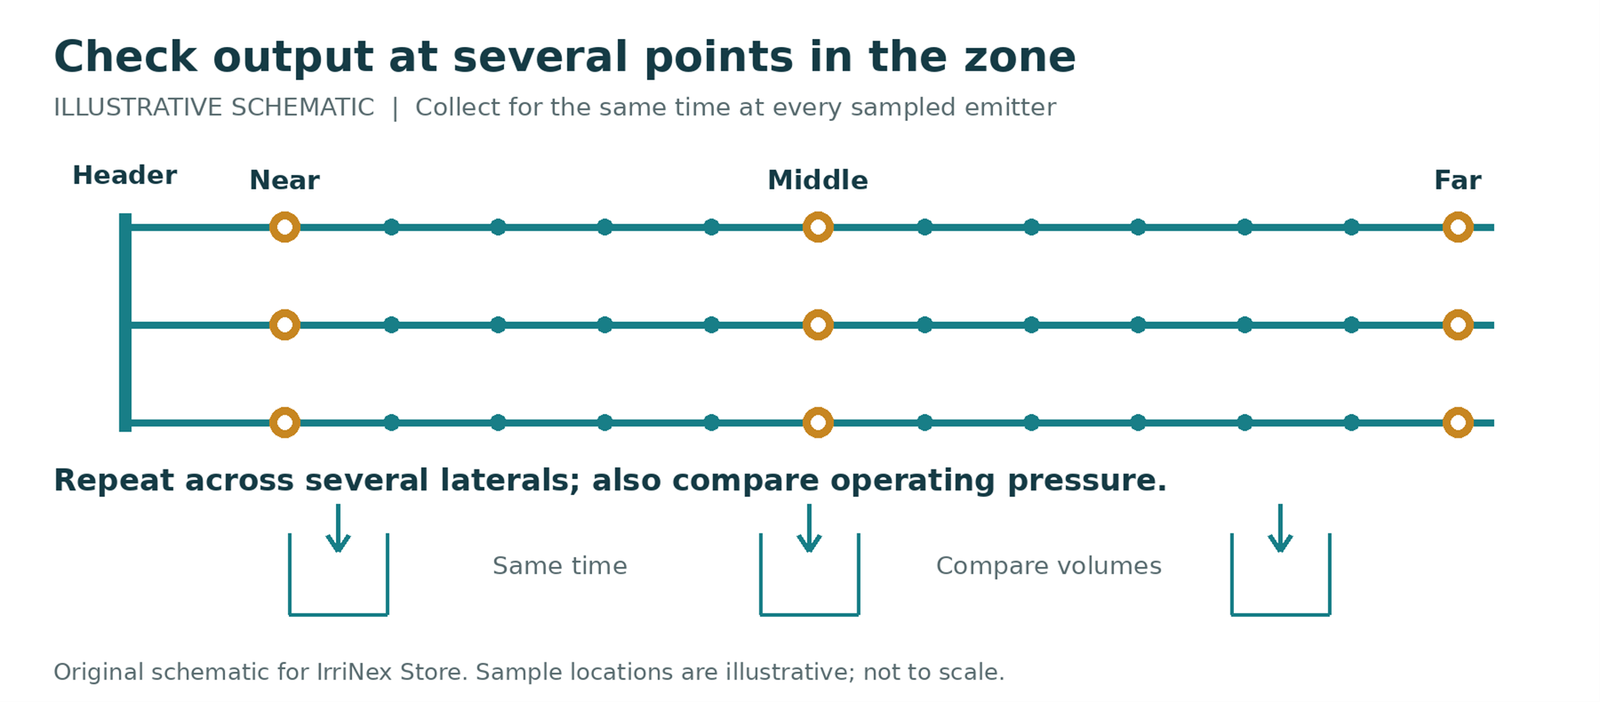
Commission a representative zone before repeating the installation. Flush the pipework and laterals, then check for leaks, kinks and blocked outlets. Measure operating pressure and collect water for equal periods from emitters near the beginning, middle and end of several laterals. Investigate uneven volumes before expanding.
Keep the initial pressure, flow and collection records as a maintenance baseline. Set watering duration using crop stage, soil moisture, rainfall and local crop-water guidance, then check the wetted root zone. A fixed runtime copied from another farm can give the wrong result.
IrriNex Store, a China-based irrigation retailer, publishes a supplier guide to flow, pressure, zones and uniformity for further planning. Site measurements and the selected equipment’s specifications should govern the final design.